Shared Files
The Shared Files Area allows you to upload, download and view any type of file for the centralization of project information across your project team. Files are not restricted by name or extension. You can upload any type of files.
The Shared Files Area is the perfect place to store project documents and files (of any type) for future reference and use by project team members and clients. For example, you can use this area to store:
-
Project sample plans
-
Central lists of focus group recruits
-
Project contact information
-
Reporting examples
-
Directions to your facilities
-
Sample files that need processing
-
Survey drafts
-
Raw image files that need formatting
Shared Files includes:
| Feature | Description |
|---|---|
| Upload Files | Upload any file type into the Shared Files Area to retrieve for future use |
| Download Files | Download stored files in the Shared Files Area |
| Delete Files | Delete unwanted files in the Shared Files Area |
Where do Files Get Uploaded?
Shared Files get uploaded into a shared folder under the environment you are running in. Each client as well as studies within each client will reside in the shared folder.
| Shared Files | |
|---|---|
| Files Reside In | Example |
| $LOCAL/shared/ | /home/<environment>/shared/<client>/study/ |
Customizing the Shared Files Page
By creating an overview.html page, you can customize your Shared Files area for each project. Below is an example of a shared files overview page that contains hyperlinks to various types of files:
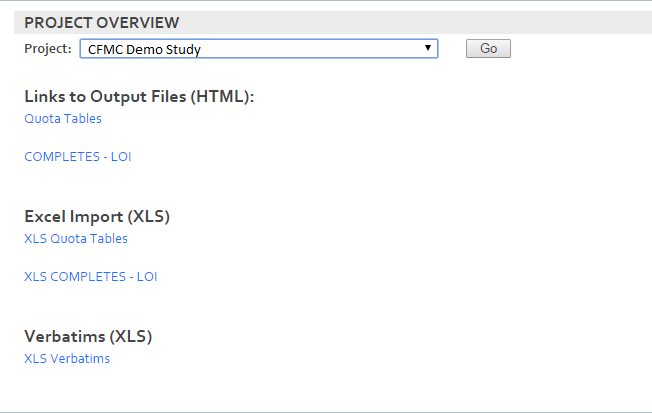
This section shows the overview.html file referenced above. If you want to make any customized changes, you can copy the contents of the file, make your changes and then upload it through Upload Files under the Shared Files tab. Your customizations can be as simple or complex as you need. You can include images and colors as well as hyperlinks.
/**************************
<html><head>
<meta http-equiv="content-type" content="text/html; charset=UTF-8"><script type="text/javascript">
      function openReport(winName, URL, pctSize) {

         // test the size
         if ( !pctSize || (typeof pctSize == "undefined") ) pctSize = 50;
         pctSize = (pctSize > 80) ? 80 : ( (pctSize < 20) ? 20 : pctSize );

         // calculate the widow's number based on percent of screen
         var xsiz = Math.round(window.screen.availWidth  * pctSize / 100);
         var ysiz = Math.round(window.screen.availHeight * pctSize / 110);
         var xpos = Math.round(window.screen.availWidth  * (100 - pctSize) / 200);
         var ypos = Math.round(window.screen.availHeight * (100 - pctSize) / 220);

         // set the window options, and open
         var opts  = "resizable=1,scrollbars=1,status=1,location=1,"
                   + "width=" + xsiz + ",height=" + ysiz
                   + ",left=" + xpos + ",top=" + ypos;
         //opts += ",location=1";

         var w = window.open( URL , winName , opts );
         w.focus();
         // charlie's open popup function OpenPopup(URL,"Shared_Window");
         return true;
      }

   </script>
   </head>

<body>
<h3> Links to Output Files (HTML):</h3>

<a href="http://<URL>/<ACCT NAME>/<CLIENT NAME>/<STUDYCODE></STUDYCODE>/tables/quota_report.html">Quota Tables</a>
<br><br>
<a href="http://<URL>/<ACCT NAME>/<CLIENT NAME>/<STUDYCODE>/tables/loi_report.html">COMPLETES - LOI</a>

<br/><br/><br/>
<h3> Excel Import (XLS) </h3>
<a href="http://<URL>/<ACCT NAME>/<CLIENT NAME>/<STUDYCODE>/tables/quota_report.xls">XLS Quota Tables </a>
<br><br>
<a href="http://<URL>/<ACCT NAME>/<CLIENT NAME>/<STUDYCODE>/tables/loi_report.xls">XLS COMPLETES - LOI </a>

<br/><br/><br/>
<h3> Verbatims (XLS) </h3>
<a href="http://<URL>/<ACCT NAME>/<CLIENT NAME>/<STUDYCODE>/tables/verbatims.xls">XLS Verbatims </a>


<br><br>

</body></html>