Run Verbatims
Verbatims create open-ended listings. When creating a verbatim list, you have the option to use Live or Test data, or an assembled suspend TR file. If you haven’t deployed your project yet and you do not have any live data, the verbatims listing will automatically use the test data. However , if you have collected data, you can choose which data file to report on from the drop down menu.
The Verbatims Run feature creates a temporary verbatim listing. This verbatim will NOT be saved unless you click the “Save Output File” button after initially creating the verbatims. Once you click the “Save Output File” button, you will then be prompted to name your verbatim listing as well as set security on it. Only saved verbatim listings can then be viewed through the View option.
Verbatim listings will run using VAR questions (short open-ends) and TEXT questions (long open-ends).
Running your List
When running your list, only fields marked in blue are required. Other fields marked in gray are optional. After specifying both required and non required fields, click the “Run List” button to process the verbatim listing. The verbatim report will automatically pop up in a separate window. (Make sure you have allow pop-ups turned on).

Input Fields:
| Required Fields in Blue | |
|---|---|
| Option | Description |
| DB file to Use | Select a database file from the drop down menu. The database stores all question variables |
| Question Type(s) to Use | Report on VARIABLE and/or TEXT |
| Questions to Use | Report on All questions, a subset of questions or specific questions |
| Output Options | Display output by question or by case id |
| Output File Name | Specify name of output file. The default output file name will be: studycode_loginname. |
| Non Required Fields in Gray | |
| Option | Description |
| Title of Report | Title will appear at the top of the report created. If a title is not entered, the title will default to the project name. |
| Use Base | Basing allows you to report on certain criteria rather than ALL criteria. Click on the “Click here to see examples of selection criteria” hyperlink for base examples. |
| Print Additional Variable | The additional variable will print with the case id in the output |
Saving List Spec for Future Runs
When running your verbatims, you have the option to save your list specifications. After specifying both required and non required fields, click the “Save List Spec” button to process your verbatim listing. When choosing that option, you will be prompted for a file name. In future verbatim runs, you can choose your saved spec from the drop down menu where it says “Select a Previously Saved Spec.” The list input options will be imported so you don’t have to re-select them again. The verbatim report will automatically pop up in a separate window. (Make sure you have allow pop-ups turned on).

Selecting Your Saved List Spec
To Select a previously saved verbatim spec, choose your saved spec from the “Select a previously saved Spec” drop down menu and then click the “Read Spec” button. All previously saved list input options will import. When finished, click the “Run List” button to run your verbatims. The verbatim report will automatically pop up in a separate window. (Make sure you have allow pop-ups turned on).

Subsetting Questions
When creating your verbatim listing, you have the option to print your open-ends for a subset questions. If you choose the subset question(s) option, two additional input boxes will appear where you can define your first and last question to run your verbatims list.

Choosing Specific Questions
When creating your verbatim listing, you have the option to print your open-ends for specific questions.
To run your verbatim listing off of specific questions, choose the Specific question(s) of type(s) selected option. Additional input boxes will appear where you can define each question.

Output Files Created
When the verbatims have finished processing, a new screen will refresh with a SUCCESS message. Three different output files are generated and automatically named. The output files generated will be in the format of studycode_loginname and will have “_oe” appended to them. An extension for each file type is added to each file name.
| Files Generated | Description |
|---|---|
| studycode_loginname_oe.csv | Comma delimited verbatim listing which can be opened in Excel |
| studycode_loginname_oe.prt | Printable verbatim listing which can be opened in any editor |
| studycode_loginname_oe.html | HTML formatted verbatim listing which can opened in a browser |
Downloading Output Files
Both the studycode_loginname_oe.prt and studycode_loginname_oe.html files can be accessed via a hyperlink at the top of the page after the list has run successfully. You can also view the report using the hyperlink displayed at the top of the page. In addition, you can select which files to download in a zipped file format by clicking the files and then clicking the “Download” button. If you want to select All the files, click the “Check All” link at the bottom of the screen. To deselect all the files, click the “Uncheck All” link at the bottom of the screen. When finished, files will be downloaded to a zipped file. Click the “Download” button to download the file to your desktop. Click the “Save Output File” button to save the report and access under View.

A pop up box will appear where you can specify the verbatim file name and the verbatim display name (which can be different from the file name). You can also choose a previously saved file from the drop down menu. The verbatim generated will automatically be named as: studycode_loginname and will have “_oe” appended to it. After choosing your file names, you can set security on these reports by clicking the Set Security check box (optional). When finished, click the “Submit” button. The file will now be listed under the View Option in Verbatims. If you do not set security, the file can be accessed by anyone who has access to View for that particular study.

Setting Security on Verbatims
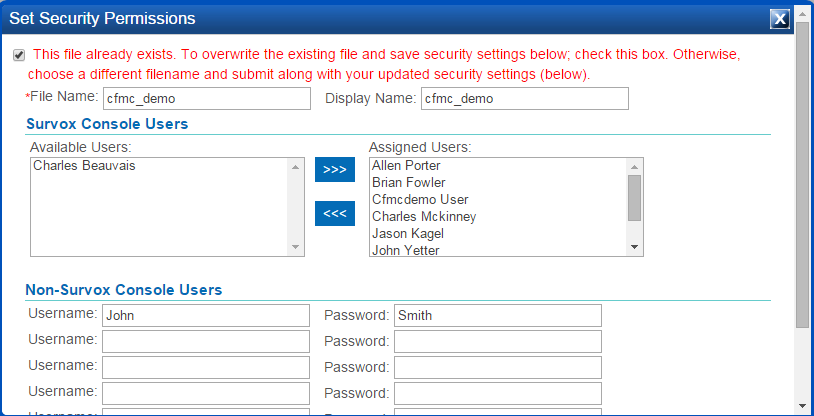
If you chose the Set Security option when saving your verbatims in the above step, a popup box will appear allowing you to specify which users can have access to the verbatims. A listing of Available Users will appear on the left and a listing of Assigned Users will appear on the right. Use the arrow buttons to move the users between the two boxes. To assign multiple users at once, hold down the ctrl or shift key as you highlight each user. For non-Survox Console users, choose a username and password. This is often used for clients that do not have Console access. Simply provide the verbatim link with their username and password. After setting security options, click the “Submit” button. Once the verbatim listing is finished processing, the link will be added to the the list of files in View. You can then click View under Verbatims on the panel on the left side of the screen to view a listing of saved verbatims. In the example below, the assigned users on the right will have access to this report. In addition, the non-Survox Console user John Smith will also have access to the report. His user name is John and his password is Smith.